
Stardust Info
This page shows Stardust information split into four tabs. You can see the unlock item for each appearance and preview it in 3D, and check damage and costs by rank, support effects, and level-up success rates.
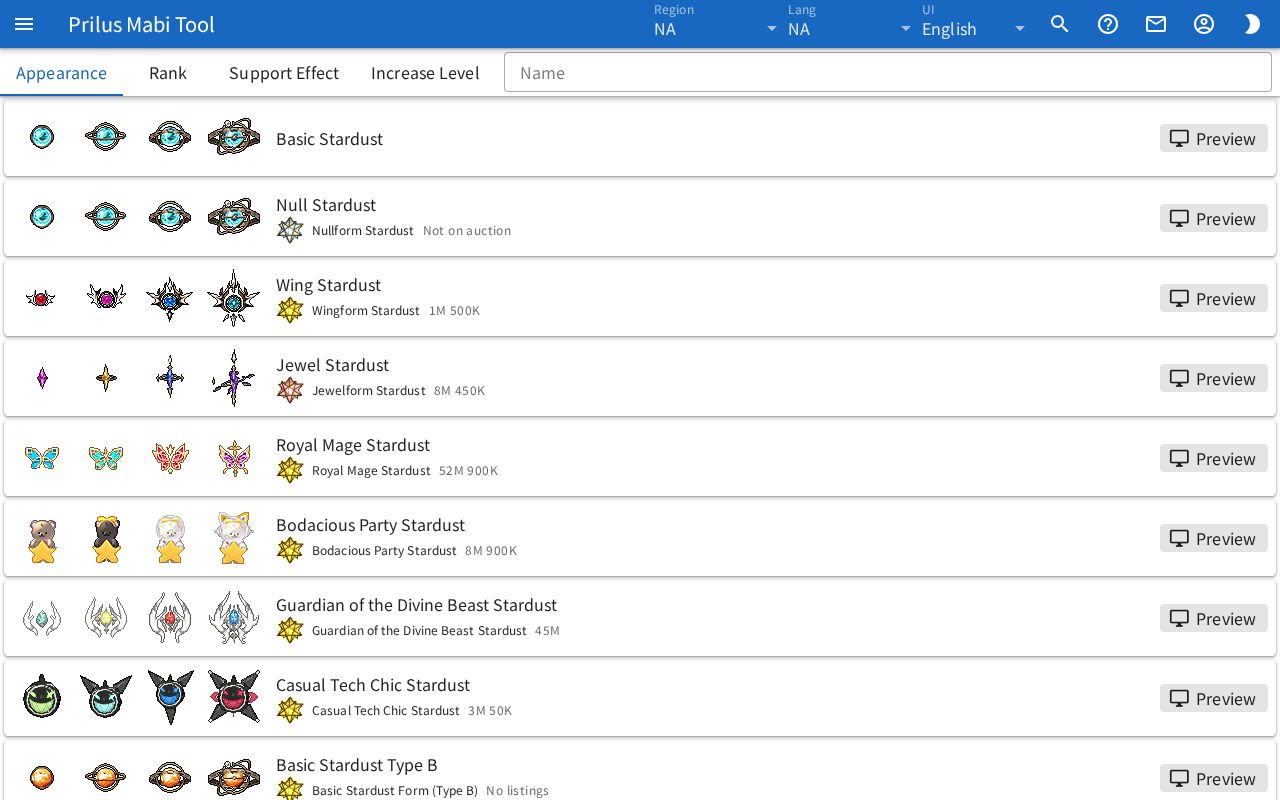
Screen layout
There are four tabs at the top.
- Appearance: The list of Stardust appearances.
- Rank: Support effect damage, unlocked effects, and cost to the next rank for each rank.
- Support Effect: The description and effects by level for each support effect.
- Increase Level: The success rate, required gold, and materials for each level.
Basic use
- In the Appearance tab, type an appearance name in the Name box.
- Check the images and unlock item of the appearance you found.
- Press Preview on the right to see it in 3D with a character.
- Click the other tabs to see rank, support effect, and level-up information.
Appearance
Each row shows one appearance.
- Name: Type an appearance name to show only matching appearances. This box appears only in the Appearance tab. On a narrow screen, it is below the tabs.
- The left of each row has several appearance images. They show how it changes as the rank goes up, in order from the left. The order of the images is the same as the order of the tables in the Rank tab.
- The appearance name is next to the images, and below it is the item that unlocks this appearance.
- Hover over the item image to see its description. Click it to open the item menu. Menu entries differ by item. See Item menu for details.
- Click the item name to open that item's info window.
- Next to the item name is the lowest Auction House price. If there is no price, it shows one of No listings, Not on auction, or No price data.
Preview
Press Preview to open a window titled with the appearance name.
- The first character you made in this browser in the Character Simulator appears. If you have not made one, a default character appears.
- The Stardust of that appearance is shown with the character in its highest-rank look and default colors.
- Even if the character has a chair or a mountable pet selected, the preview leaves them out.
There are buttons at the top right of the window.
- Person-with-pencil button (Open in Character Simulator): Closes the window and adds the character, wearing the Stardust as shown, to the Character Simulator as a new character.
- Film button: Saves the view as a GIF.
- Tree button: Opens the Hierarchy panel. It lists the parts that make up the model. Press an eye button to hide or show that part.
- Eyedropper button: Appears only for models whose colors can be changed. Opens the Color Modify panel. Click a box to pick a color.
- Three-line button: Opens the Render Settings panel. Its options are the same as Render Settings in the Character Simulator help.
Rank
There is one table for each rank range. The table title shows the rank range and count, such as "Rank ○-○ · ○ pieces". If a range has only one rank, it shows "Rank ○ · ○ pieces".
The table columns are as follows.
| Column | Content |
|---|---|
| Rank | The rank number. |
| Support Effect Damage | Shown as "x○". |
| Avail. Effects | The image and name of the support effect unlocked at that rank. Empty if there is none. |
| Cost to next rank | The Required Gold, materials, and counts to go up to the next rank. A rank that cannot go higher shows Max rank. |
Support effect
Each support effect has a row with its image and name.
- Click a row to expand it. Click it again to collapse it. You can expand several at once.
- When expanded, the support effect description is shown.
- For support effects with values by level, the effects for each of "Level 1", "Level 2"… are shown in a table below the description.
Increase level
The table has one row for each level.
- Level
- Success Rate: Shown in %.
- Required Gold
- Materials: The names and counts of the items needed.