
Preview Skill Effect Changes
This page lists items that change skill effects. Pick an item to see which skill effect it changes and what it changes to, and compare the original and changed effects in a preview.
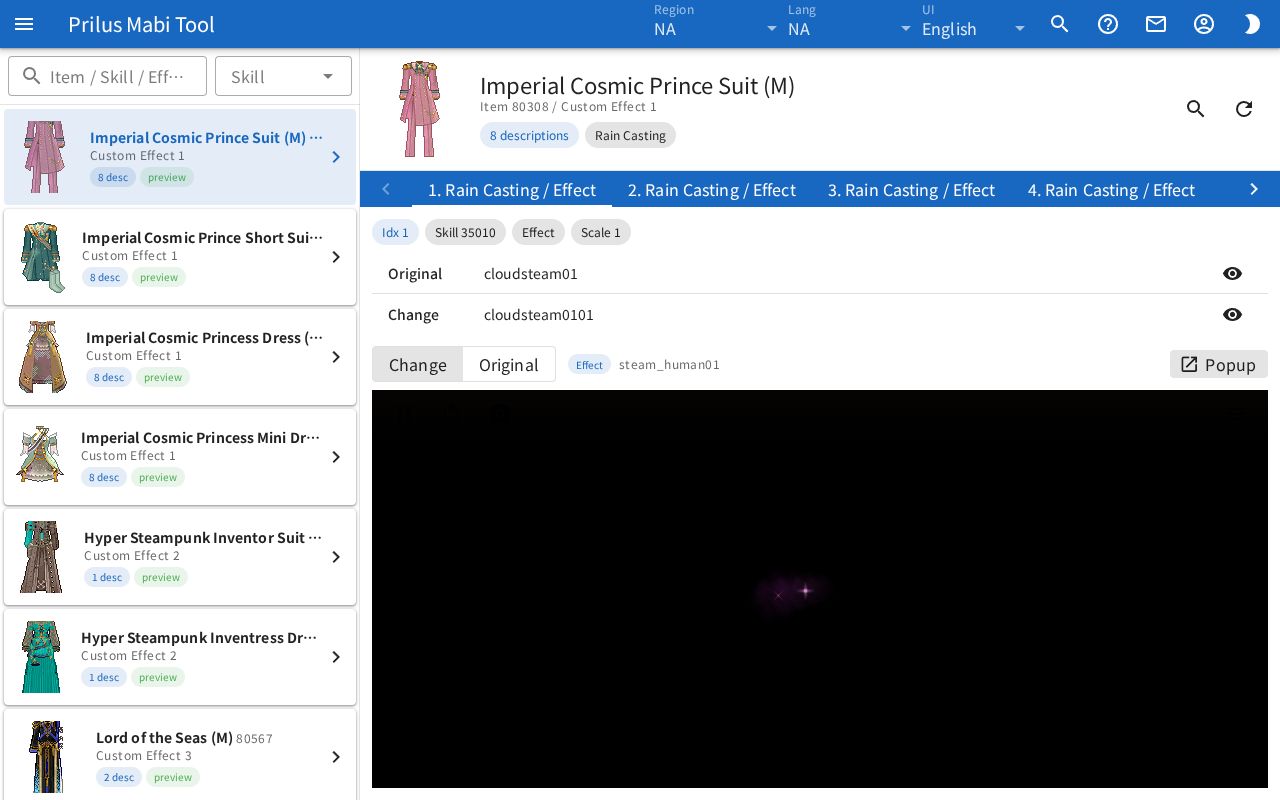
Screen layout
- Left: Two search boxes and the item list.
- Right: Effect details and a preview for the item you picked.
- If you have not picked an item yet, the right side shows No item selected.
Basic use
- Type an item name or skill name in the Item / Skill / Effect box.
- Click an item in the list on the left.
- On the right, check which skill and effect names change.
- Press the Change and Original buttons above the preview in turn to compare the effects.
Finding items
- Item / Skill / Effect: Search by item name, skill name, effect name, or ID.
- Skill: Click the box to open a list of skills. Pick a skill to keep only the items that change that skill's effect. The number in parentheses after each skill name in the list is the skill ID. Press × to clear the filter.
- If you use both boxes, only items that match both filters stay.
Item list
Each card shows one item.
- It shows the item image, name, and item ID.
- Below that is the Custom Effect ID.
- The ○ desc tag tells you how many effects this item changes.
- A green preview tag means the item has an effect you can preview.
- The item you picked is highlighted.
- With the keyboard, move to a card with Tab and press Enter to pick that item.
On a wide screen, the first item in the list is picked when you open the page. If you change Skill and the current item no longer matches, the first item in the remaining list is picked.
Item details
The top right shows details for the item you picked.
- It shows the item image, name, and the IDs "Item ○ / Custom Effect ○".
- Hover over the item image to see its description. Click it to open the item menu. Menu entries differ by item. See Item menu for details.
- Next to ○ descriptions is the skill name of the effect you are viewing.
- Magnifier button (Item Info): Goes to this item's item page.
- Round arrow button (Reload Preview): Reloads the preview from the start.
Picking an effect
If one item changes several effects, tabs appear below the item details. Each tab reads "number. skill name / type". On a narrow screen, a selection box appears instead of tabs.
- Pick a skill in the Skill box to open that skill's tab.
- If you click another item, the tab number you were viewing stays open. If that item has fewer tabs, the last tab opens.
Effect details
Below the tabs are the details of the effect you picked.
- Top line: Shows the Idx, the Skill ID, and the type. The type is Effect or Prop. Effects with a set size also show Scale.
- Original: The name of the effect normally used.
- Change: The name of the effect used when you use the item.
- If there is no name, it shows -.
- Press the eye button at the right of a row to show that row's effect in the preview. You cannot press it on a row without a name.
Preview
The preview is below the effect details.
- Use the Change and Original buttons to choose which effect to preview. The button for a side without a name cannot be pressed.
- When you pick an item, Change is selected. If there is no changed effect name, Original is selected.
- Next to the buttons are the preview type (Effect or Prop) and its name. If there is nothing to preview, it shows No preview.
- Popup: Opens the current preview in a separate window. You cannot press it if there is nothing to preview.
- If the type is Effect but there is no name, the notice "No effect name is available for this row." appears.
- If the type is Prop but no matching prop is found, the notice "No matching prop was found for this row." appears.
- If the effect fails to load, an error message appears.
Effect preview
If the type is Effect, the effect plays. Buttons are at the top of the preview. Hover over a button to see its name.
- Play / Pause: Stops the effect or starts it again.
- Restart: Plays the effect again from the beginning.
- Camera: Returns the camera to its starting position.
- Settings: Opens the Effect Settings panel on the right. Press × to close it.
Change the following in Effect Settings. You can also type slider values as numbers in the box to the right.
- Simulation Speed, Particle Density
- Skip Idle Time
- Bloom, Bloom Strength
- Background Color: Pick from the list or enter a color value.
- Emitter Motion: Choose from Projectile Preview, Effect path, and Origin. If you choose Projectile Preview, Projectile Duration and Projectile Travel appear.
- Layers: Each layer that makes up the effect has a switch. Turn one off to hide that layer.
Prop preview
If the type is Prop, the prop is shown in 3D. Buttons are at the top right of the preview.
- Film button: Saves the view as a GIF.
- Tree button: Opens the Hierarchy panel. It lists the parts that make up the model. Press an eye button to hide or show that part.
- Eyedropper button: Appears only for models whose colors can be changed. Opens the Color Modify panel. Click a box to pick a color.
- Three-line button: Opens the Render Settings panel. Its options are the same as Render Settings in the Character Simulator help.
Depending on the model, State and Size tags appear at the top left. Click them to change the model's state and size. You can pick more than one State at once.
On a narrow screen
- At first, only the item list is shown.
- Click an item to show its details and preview on the full screen.
- Press the arrow button at the top left (Back) to return to the list.
- If you change Skill and the item you were viewing no longer matches, you return to the list.