
Race Skills and Models
This page helps you look up Mabinogi races. For each race, you can see the skills it has and preview its 3D model.
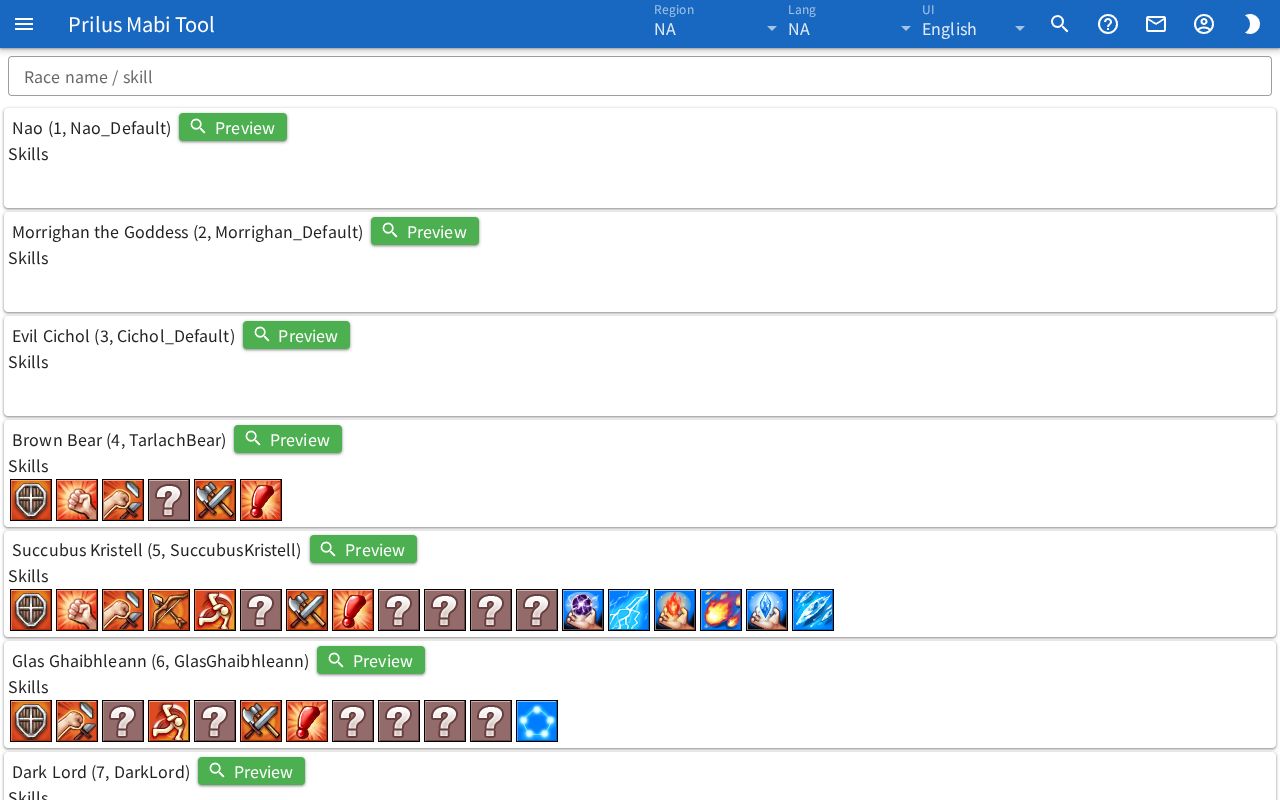
Screen layout
- The Race name / skill search box is at the top.
- Below it is the race list. Each card shows one race.
- The first line of each card has the race name and the Preview button. The parentheses after the name hold the ID and the English name. Races that are also in the pet list have a Pets tag as well.
- Below that, Skills shows the skill icons the race has.
- Races with a Skill Damage Taken entry also show Skill Damage Taken icons to the right.
Basic use
- Type a race name in the Race name / skill box.
- Races with a matching name stay in the list.
- Hover over the Skills icons to check the skill names.
- Press Preview to open the 3D model window.
Finding races
- Type a race name or ID to show matching races.
- Type a skill name to also show races that have that skill. Races with a matching name come first, and races with a matching skill come after them.
- Skills icons that match the name you typed get an outline.
- Clear the box to show all races.
Reading race details
- Click a race name to open a window with that race's full details. Click an entry to expand or collapse it.
- Press Pets to open the Pets page searched for this race's ID.
Skills
- Hover over or click a Skills icon once to see the skill name and rank.
- Click it once more right after to open a window with that skill's full details.
Skill damage taken
- Shown only for races that have this entry.
- Hover over or click an icon once to see the skill name and ratio (%).
- Click it once more right after to open a window with that skill's full details.
3D preview
Press Preview to open the "race model preview (race name) (ID)" window. The inside of the window is the 3D view. While the model loads, a progress bar moves at the top.
3D view controls
- Drag left or right with the left mouse button to rotate the model. Drag up or down to change the angle you look down from.
- Drag up or down with the right mouse button to move the viewing height up or down.
- Scroll the wheel to zoom in or out.
- On a touch screen, dragging with one finger is the same as dragging with the left button. Spread or pinch two fingers to zoom in or out. Move two fingers up or down together to move the viewing height.
Buttons on the 3D view
There are buttons at the top right of the 3D view. Panels opened with these buttons open on the right. Press × to close them.
- Film button: Saves the view as a GIF. While it is being made, a progress indicator spins on the button. Change the size in GIF Capture Size in Render Settings.
- Tree button: Opens the Hierarchy panel. It shows the parts that make up the model as a tree list. Press an eye button to hide or show that part. Press the arrow in front to expand or collapse the entries below it.
- Eyedropper button: Opens the Color Modify panel. It appears only when the model has colors that can be changed. Click a color box and pick a color to apply it to the model right away.
- Three-line button: Opens the Render Settings panel.
Render Settings
You can also type slider values as numbers in the box to the right. Render settings are saved in this browser.
- FPS, Field of View
- Light Pitch, Light Yaw, Light Intensity
- Enable Animation
- Use Post Process, Bloom, FXAA, Bloom Strength, Bloom Radius, Bloom Threshold
- Background Color: Pick from the list or enter a color value. Press × to return to the original color.
- Sky: When on, Sky Preset, Time of Day, Animate Time, and Clouds appear.
- Map: When on, you can choose a Region and Section. While the map loads, Loading map... appears. Press Back to start point to return to the spot where you first stood on the map.
- Shadows
- GIF Capture Size: The size used when saving as a GIF.
- Focus Head, Focus Body: Fits the camera to the head or the whole body.
- Reset: Returns the render settings to their defaults.