
Spirit Weapon Effect Preview
Preview a weapon with a spirit effect applied in 3D. Pick a weapon, spirit, and spirit level, and the view changes right away. You can also watch a character attack a Wooden Man with that weapon.
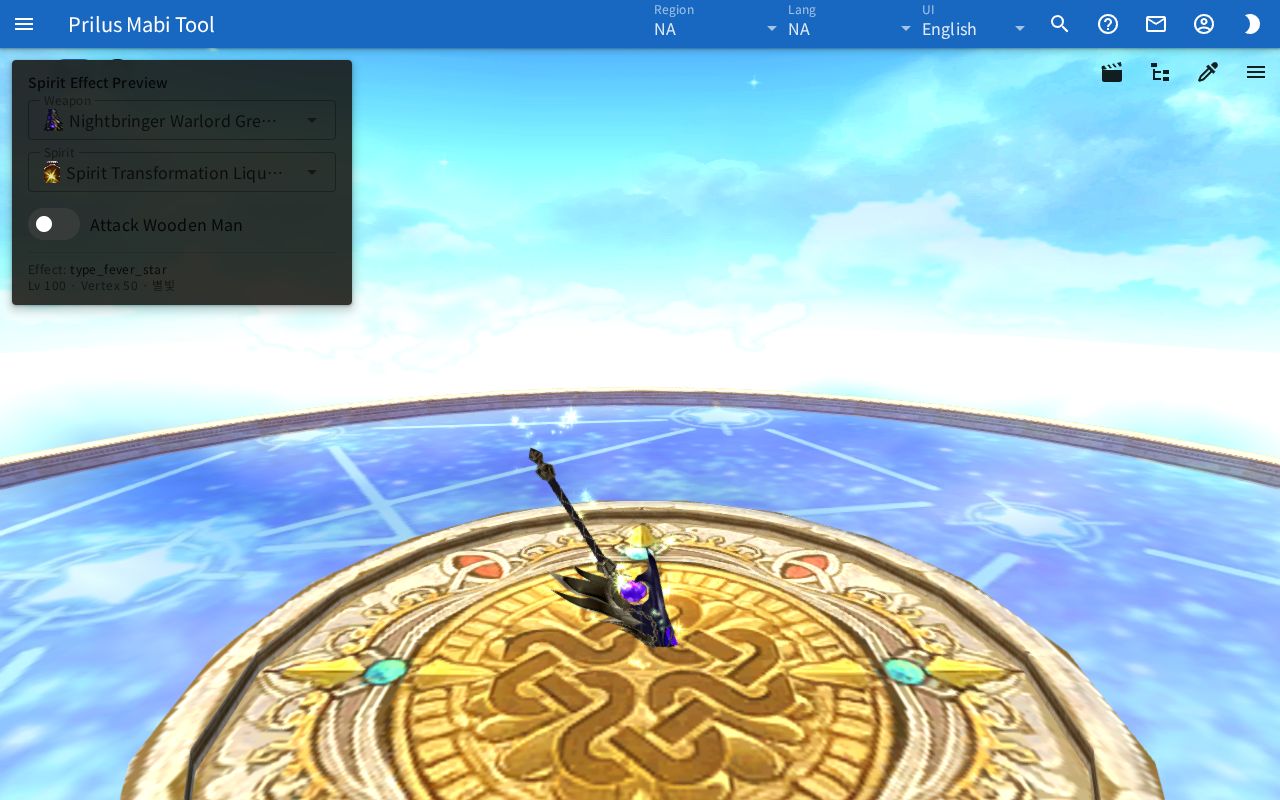
Screen layout
- Center: A 3D view fills the whole page.
- Top-left panel (Spirit Effect Preview): Pick Weapon, Spirit, and Attack Wooden Man, and see details of the effect shown now. Spirits with effects for each level also show Spirit Level buttons.
- Buttons at the top right of the 3D view
- Film button: Saves the view as a GIF.
- Three-line button: Opens the Render Settings panel.
Basic use
- Click the Weapon box and pick a weapon. You can type a name to search.
- Click the Spirit box and pick a spirit.
- If Spirit Level buttons appear, press the level you want to see.
- See the effect applied to the weapon in the 3D view.
- To watch it attack, turn on Attack Wooden Man.
Whatever you change, the 3D view changes right away. While loading, Loading… appears at the bottom of the panel.
Weapon
- Click the box to open the list of right-hand equipment. Each entry shows an image, name, and ID.
- Type in the box to narrow the list.
- The weapon you picked is remembered in this browser. The next time you open the page, it starts with the same weapon.
Spirit
- Click the box to open the list of spirits in name order. Each entry shows an image, name, ID, and type.
- Type a name or ID in the box to narrow the list.
Spirit level
If the spirit you picked has several effects by level, a row of Spirit Level buttons appears. Press a button to pick the level to see. For spirits with only one level effect, the button row does not appear.
Effect details
Below the divider at the bottom of the panel is the effect shown now.
- Effect: The name of the effect shown now. If there is none, it shows -.
- Below that is "Lv ○ · Vertex ○". Effects with a description have it added at the end.
- If the effect cannot be found, the notice "effect data not found: ○○" appears.
Attack Wooden Man
Turn on Attack Wooden Man to see a character holding the weapon you picked and attacking a Wooden Man. The effect is applied to the weapon the character holds. Whether it is on or off is remembered in this browser.
- When it is on, a Critical switch appears next to it. It starts turned on. When on, you see a critical hit. When off, you see a normal hit.
- The attacking character looks like the first character in the Character Simulator list. If that character's race cannot use the weapon you picked, it is shown as a race that can.
- If there is no character that can use it, the message "No saved character can use this item (…). Create one in the Character Simulator." appears. Press the Character Simulator button below it to go to the Character Simulator. This button does not appear when the page is opened as a window from the item menu.
- For a weapon that cannot show an attack, the message "Attack preview is not available for this weapon." appears.
Using the 3D view
- Drag with the left mouse button to rotate.
- Drag up or down with the right mouse button to change the viewing height.
- Scroll the wheel to zoom in or out.
- On a touch screen, drag with one finger to rotate, and spread or pinch two fingers to zoom in or out.
Render Settings
Press the three-line button at the top right to open the Render Settings panel on the right. Press × to close it. It has FPS, Field of View, lighting, post-processing, Sky, Map, Shadows, GIF Capture Size, Focus Head, Focus Body, Reset, and more. Its options are the same as Render Settings in the Character Simulator help.
Save as GIF
Press the film button at the top right to save the view as a GIF. While it is being made, a progress indicator spins on the button. If there are several characters on screen, a confirmation window first warns that it may be slow. Change the size in GIF Capture Size in Render Settings.
Hierarchy and Color Modify
Depending on the model, more buttons appear at the top right.
- Tree button: Opens the Hierarchy panel. It lists the parts that make up the model. Press an eye button to hide or show that part. Press an arrow to expand or collapse the parts below it.
- Eyedropper button: Opens the Color Modify panel. Click a color box to change the color of each part.