
Dress Up Characters and Play Motions
Try outfits, hair, and dyes on a 3D character and play motions. You can also put several characters on one screen together.
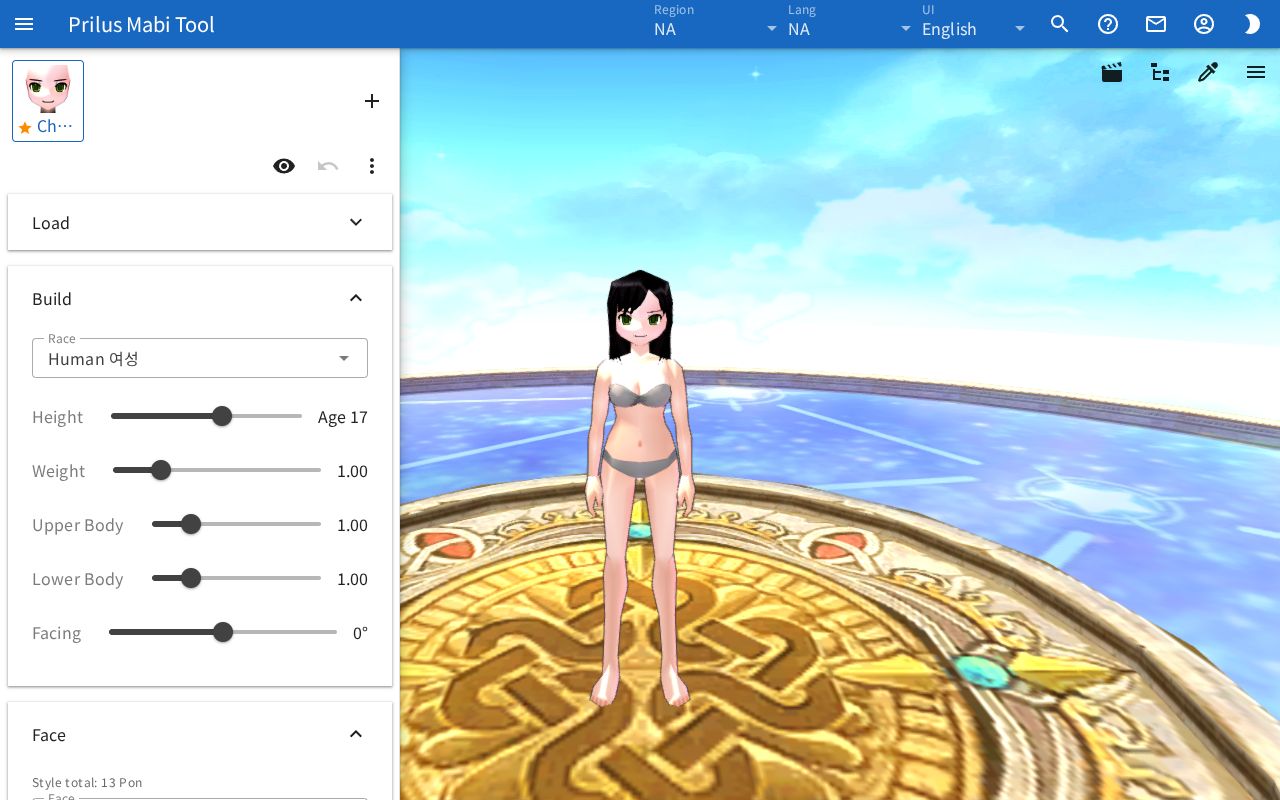
Screen layout
- Center: the 3D view fills the whole page.
- Button row at the top of the 3D view
- Pencil button on the left: opens the edit panel.
- Four-arrow button next to it (Move characters): drag characters to move them.
- Film button on the right: saves the view as a GIF.
- Tree button next to it: opens the Hierarchy panel. It appears after a character is shown.
- Eyedropper button next to it: opens the Color Modify panel. It appears when there are parts whose color can be changed.
- Three-line button at the far right: opens the Render Settings panel.
- While loading, a progress bar moves at the very top of the 3D view.
- Left edit panel
- At the top is the character list.
- Below that are the buttons for handling characters.
- Below that are sections you can collapse and expand: Load, Build, Face, Equipment, Scene, Expression, Motion Sequence, and Advanced, in that order.
- Press a section name to collapse or expand it. At first only Advanced is collapsed.
Basic use
- When you open the page, the edit panel is open on the left. If it is closed, press the pencil button at the top.
- In Build, choose a Race. Adjust the body with sliders such as Height and Weight.
- In Face, choose Face, Hair, Hair Color, and so on.
- In Equipment, press slots such as Armor and Hat to choose items.
- Press the palette button on the right of an item slot to dye it.
- In Expression, choose an action and press the play button (▶) to have the character do it.
Your changes are saved automatically in this browser. They stay the same the next time you open the page.
Viewing the 3D view
- Drag with the left mouse button to change the viewing angle.
- Drag up and down with the right mouse button to change the viewing height.
- Scroll the wheel to zoom in or out.
- On a touch screen, drag with one finger to change the angle. Spread or pinch two fingers to zoom in or out. Move two fingers up and down to change the viewing height.
- For mouse actions while Move characters is on, see Move characters below.
Choosing from a list
Slots with many choices, such as face, hair, and equipment, all work the same way.
- Press a slot to open a list below it. The slot turns into a search box.
- Enter a name in the search box to narrow the list.
- Above the list, Current: is followed by what is chosen now.
- Press an entry in the list to switch to it.
- Press the up arrow on the right of the search box to collapse the list. Only one list opens at a time.
- In lists with a star button on the right of each entry, press the star button to add it to or remove it from favorites. Favorite entries appear at the top of the list.
- Press the magnifier button on the right of an entry to open a window showing it large. It only shows it and doesn't choose it. Equipment is shown worn, on the full body.
- For slots that can be emptied, press × while the list is collapsed to empty it.
- If there is price info, it appears under the name.
Handling several characters
At the top of the edit panel, characters are lined up with their face pictures and names.
- Press a character to edit it. Pressing a character in the 3D view also chooses it and opens the edit panel.
- Press the + button (Add) on the right of the list to create a new character.
- The first character in the list has a star before its name.
The buttons below the list apply to the currently chosen character.
- Eye button: press Hide from stage to make the character disappear from the 3D view. It stays faded in the list with a Hidden tag. Pressing it again makes it Show on stage.
- Undo: undoes the look changes on this character one at a time.
- Three-dot button (Character menu)
- Make main: moves this character to the front of the list.
- Swap with left, Swap with right: change the list order.
- Duplicate: makes one more character with the same look right after it.
- Rename: edit the Character Name and press Save.
- Copy link: copies a link that opens this character. See Sharing by link below.
- Reset position: puts a moved or turned character back where it started.
- Delete: press Delete in the confirmation window to delete it. After deleting, press Undo in the message that briefly appears at the bottom of the screen to bring it back. If there is only one character, it can't be deleted.
Move characters
- Press the four-arrow button (Move characters) at the top.
- The edit panel closes, and the hint "Drag a character or the ground to move, scroll to turn, right-drag to turn the map" appears next to the button.
- Following the hint, drag with the mouse or scroll the wheel to set the position.
- In this state, pressing a character only chooses it and doesn't open the edit panel.
- Press the button again or open the edit panel with the pencil button to finish moving.
The moved position and direction are saved too. You can also change the direction with the Facing slider in Build. To put a character back where it started, press Reset position in the character menu.
Build
- Race: you can type to search. When you change the race, other lists show only what that race can use.
- Height: the age appears to the right of the slider as "Age ○". Some steps show Imp Mini Potion instead. Hover over a step in a different text color to see Not available in game.
- Weight, Upper Body, Lower Body: the current value appears to the right of the slider.
- Facing: changes the direction the character faces, in degrees (°).
Face
- Choose Face, Hair, Hair Color, Skin Color, Eye, Eye Color L, Eye Color R, and Mouth.
- The Face and Hair lists show only what fits the race.
- Face, Hair, Eye, and Mouth can be viewed large with the magnifier button.
- Style total appears above the slots. It shows the values of the currently chosen look added up. Those with no price record are counted after no data.
Equipment
Item slots
There are Armor, Hat, Gloves, Shoes, Robe, Puppet, Halo, Facewear, Tail, Right Hand, Left Hand, Right Hand (Set 2), and Left Hand (Set 2) slots.
- Press the palette button on the right of a slot to change colors. For items whose color can't be changed, the button can't be pressed.
- The Right Hand and Left Hand slots also have an eye button. Press Hide in hand to keep the equipment but hide it only from the hand. Pressing it again makes it Show in hand.
- Equipment total appears above the slots. Those with no price record are counted after no data.
- Custom Motion is also chosen from the outfit list the same way.
Motion
- Motion: choose from Normal, Combat, Walk, and Run.
- Hood up: appears only when wearing a robe.
- Weapon Motion Type: choose from None, Royal Alchemist, Motion Card, and Visual Motion Card.
Chair and Mountable Pet
- Choose a Chair or Mountable Pet to have the character sit or ride. The Mountable Pet list shows only what the current race can ride.
- A chair and a mountable pet can't be used together. Choosing one empties the other.
- At first the character sits in an empty seat.
- If there are several seats, choose where to sit in Seat. Seats taken by other characters have that character's name in parentheses. For mountable pets, only seats the current race can ride appear.
- When the Equipment section is expanded, a number button appears on each seat in the 3D view. Press a number to move to that seat.
- If several characters choose the same chair or mountable pet, they sit or ride together.
- Change the color of the chair or mountable pet with the palette button. If several characters are using it, only the character furthest forward in the list can change it.
Stardust
- Choose a shape in Stardust. You can change its color with the palette button.
- Once you choose a shape, Rank appears. Choose from entries like "Rank ○-○ · ○ pieces".
Changing colors
Press a palette button to open the "○○ color" window. While the color window is open, the edit panel closes, and it opens again when you close the color window.
- The A, B, C… tabs at the top are the parts to color. Each tab shows its current color as a small swatch.
- In the color window for equipment, chairs, and mountable pets, choosing a tab makes that part blink in the 3D view.
- When you open the color window for equipment, the camera fits that part or the full body.
- Pick a color on the color board or enter RGB or HEX values.
- If the window has a Dye Code box, enter a code and press Enter or click outside the box to use that color.
- Press the round arrow button on the right of the tabs to put all parts back to their original colors.
- Press the + button at the bottom to add the current color to the list. You can pick an added color again from the middle area. The − button removes that color from the list. Added colors are saved in this browser.
Scene
- Stage: press Day, Evening, or Night to switch to that stage.
- Effects
- Choose a Title and Option Title. You can type to search, and add them to favorites with the star button. Favorite titles appear at the top of the list. Press × to empty it.
- Depending on the weapon in hand, Special Upgrade, Spirit Weapon, and Erg switches appear for each hand.
- When you turn on Special Upgrade, choose Type and Level. Choose Type from Standard, S, and R. Some can't be chosen depending on the weapon.
- When you turn on Spirit Weapon, choose Form and Level.
- When you turn on Erg, choose Grade and Level.
- If not all effects can be shown, "Some effects could not be shown." appears.
Expression
Choose an action in the Expression box and press the play button (▶) on the right. You can type to search. The list shows only what the current race can use.
Motion Sequence
- In Equipment, put an outfit that supports motion sequences in the Armor slot. If it isn't such an outfit, "Wear an outfit that supports motion sequence." appears.
- Turn on the Use motion sequence switch. The outfit's slot count appears after the switch name.
- Slots appear from Slot 1 up to the slot count. Choose the motion for each slot from the list.
- Press Reset to put the slots back to their starting state.
Motion sequences play only while standing with both hands empty. To view it with hand equipment chosen, press Hide in hand in Equipment.
If motions can't be loaded, "Some motions could not be loaded." appears.
Loading and sharing
Clipboard
Use the buttons under Clipboard in the Load section.
- Save: copies the current character to the clipboard as a text code. If the browser blocks copying, the code appears in the Copy: window. Copy that code yourself.
- Load: reads the code in the clipboard and changes the currently chosen character to that look. If the code can't be read, "Could not read what you pasted." appears.
Sharing by link
- Press Copy link in the character menu to copy a link that opens this character.
- When the link is opened, the character is added to the character list with a From link tag. If the same character is already in the list, it chooses that character instead of adding a new one.
- Pressing Open in Character Simulator in the Try On, Try Sitting, or Stardust Appearance window from the item menu works the same way. The look you were viewing in the window is added to this page's character list.
- Press Keep to save that character in this browser. Editing that character also saves it.
- If the link can't be read, "Could not read that link." appears.
- While you edit, the address in the address bar also changes to a link that opens the current character.
Register Character
Press Register Character under Register in the Load section to open a window. It registers this look with the current map, position, and camera under a character name. Anyone can look it up by name.
The sky setting, Effects, and Motion Sequence settings are registered too. Look up registered characters by name in Character Lookup.
You need to sign in.
- Sign in with a sign-in button in the window (for example, Sign in with Microsoft). Once signed in, "Signed in as ○○" and Sign out appear.
- Enter the Character Name. At first it has the current character's name. You can't type before signing in.
- Press Register.
- If you enter a name you already registered, the button changes to Overwrite. When overwriting, a confirmation window appears first.
- You can't use a name someone else already registered.
- You can register up to 20 characters.
- If the name doesn't follow the rules, the reason appears below the input box. For example, a name can't start with a number. Numbers can only be used at the end of a name. English letters can't be mixed with other characters.
Under My Characters, your registered characters appear with their region and update time. While loading, a progress bar appears. If you have no registered characters, "No characters yet." appears.
- Press the save button (Overwrite) to overwrite that character with the current character. Characters registered in another region can be overwritten only after switching to that region.
- Press the trash button to open a confirmation window. Confirm to delete the registered character.
Render Settings
Press the three-line button at the top right of the 3D view to open the Render Settings panel on the right. Press × to close it. You can also enter slider values directly as numbers in the box on the right. Render settings are saved in this browser.
- FPS, Field of View
- Light Pitch, Light Yaw, Light Intensity
- Enable Animation
- Use Post Process, Bloom, FXAA, Bloom Strength, Bloom Radius, Bloom Threshold
- Background Color: choose from the list or enter a color value. Press × to go back to the original color.
- Sky: when on, Sky Preset, Time of Day, Animate Time, and Clouds appear.
- Map: when on, you can choose a Region and Section. While the map loads, Loading map... appears. Press Back to start point to go back to where you first stood on the map.
- Shadows
- GIF Capture Size: the size used when saving as a GIF.
- Focus Head, Focus Body: fit the camera to the head or the full body.
- Reset: returns the render settings to their defaults.
Save as GIF
Press the film button at the top right of the 3D view to save the view as a GIF. While it is being made, a progress indicator spins on the button. If there are several characters on screen, a confirmation window warning that it may be slow appears first. Change the size in GIF Capture Size in Render Settings.
Hierarchy and Color Modify
Open them with the buttons at the top right of the 3D view. The panel opens on the right, and pressing × closes it.
- Hierarchy (tree button): the parts that make up the 3D view appear with their names, level by level. Press an arrow to expand or collapse the level below. Press the eye button to hide that part or show it again.
- Color Modify (eyedropper button): each part to color has a color box. Press a box and pick a color to change the color in the 3D view right away.
Changes made in these two panels are not saved. To keep equipment dyed, use the palette button.
Advanced
- Rebuild previews: clears the small pictures in the lists and draws them again. If a picture looks different from the current look, try pressing it.
Good to know
- The character list and your changes are saved in this browser. To use them in another browser or device, use Copy link or the clipboard Save.
- When you change the race, the face, hair, equipment, and expression lists show only what that race can use. Mountable pets the new race can't ride are emptied.
- Motion sequence settings are saved for the outfit you are wearing. If you change the outfit, you need to turn on Use motion sequence again.