
Barter Goods and Trade Planner
View the goods you can exchange at Barter Trading Posts. Enter a count on goods to see the materials and cost needed, the time to reach another Trading Post, and how many trips it takes to carry them.
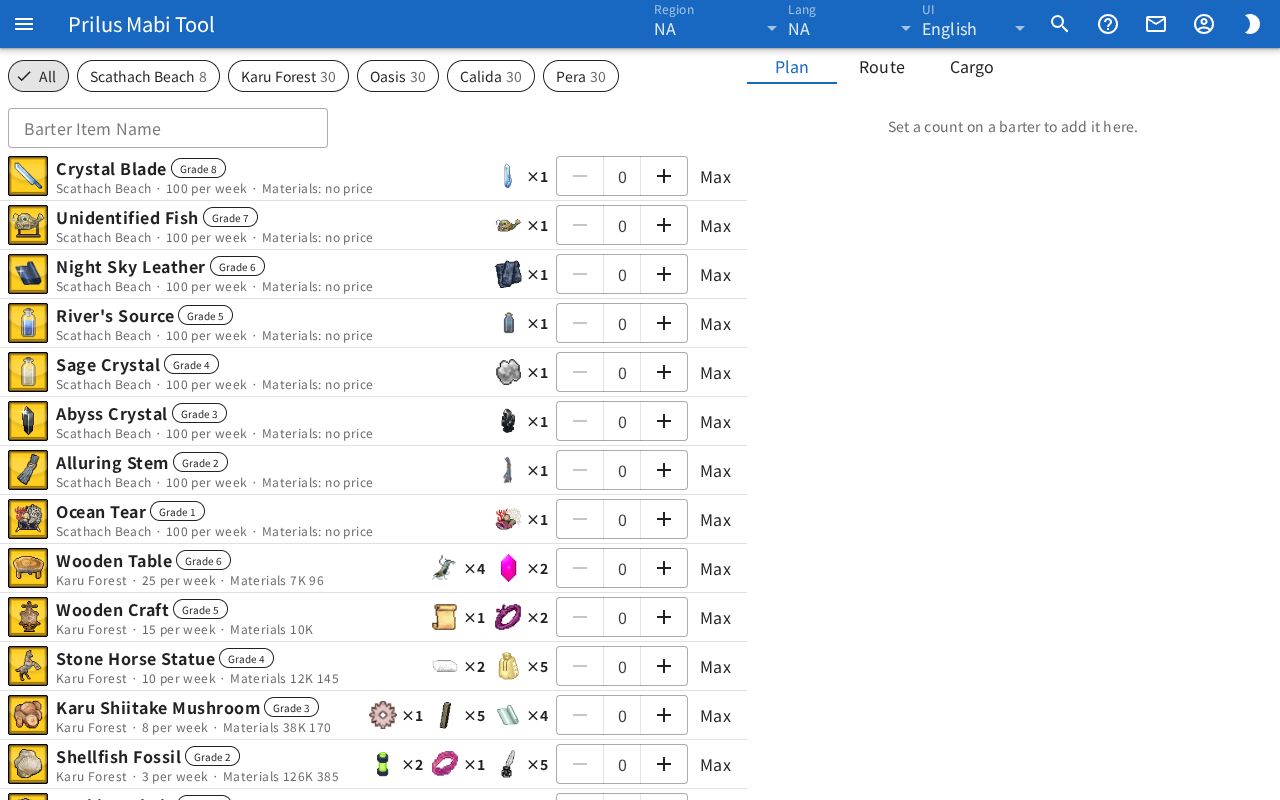
Screen layout
On a wide screen, the goods list is on the left and the planning area is on the right.
- Above the list are the Trading Post buttons and the Barter Item Name search box. When you pick one Trading Post, the Max all here button also appears.
- The list shows one item of goods per row. Each row has the goods image, name, exchange limit and material cost, the materials needed, and a count box.
- At the top right are the Plan, Route, and Cargo tabs. In regions where routes cannot be shown, only the plan is shown, without tabs.
On a narrow screen, switch views with the List, Plan, Route, and Cargo buttons at the top. The number next to Plan is the number of goods added.
Basic use
- In the Trading Post buttons, click the Trading Post where you will exchange goods.
- Enter a count in the count box of the goods row you want. Press Max to fill in the exchange limit.
- In Plan, check the materials needed, how many you are short, and the cost to buy.
- Enter the materials you have in the Owned boxes. The shortages and cost change right away.
- Check the time to reach another Trading Post in Route, and how many trips it takes to carry the goods in Cargo.
Finding goods
- The Trading Post buttons show each Trading Post's name and number of goods. Press All to see goods from all Trading Posts.
- When you pick a Trading Post, the starting Trading Post in Route also changes to it.
- Barter Item Name: Search by goods name, Trading Post name, or material name. Clear it with the X button at the right of the box.
- If no goods match, the notice "Nothing matches." appears.
- In regions with no barters, the notice "No barters in this region." appears.
Goods rows
- Goods with a grade have a Grade ○ tag next to the name.
- The small text below the name shows the exchange limit and material cost. When you are viewing All, the Trading Post name is added at the front.
- The exchange limit is shown as "○ per day", "○ per week", and so on. Goods with no limit do not show it.
- Materials ○: The cost of buying the materials for one item of goods at the lowest Auction House price. If some materials have no known price, "+○ unpriced" is added. If no material prices are known, it shows Materials: no price.
- To its right are the images and counts (×○) of the materials needed.
- Enter the count to exchange in the count box at the far right. You can also change it with the - and + buttons on either side of the box. You cannot enter more than the exchange limit.
- Goods with an exchange limit have a Max button next to the count box.
- Rows with a count entered are highlighted.
- Press Max all here to fill every item of goods with an exchange limit in the current list up to its limit. If there is nothing more to fill, you cannot press it.
Hover over a material image to see its name. Click it to open the item menu. Material images in the plan work the same way. Menu entries differ by item. See Item menu for details.
Plan
Goods with a count entered are gathered here. If there is nothing, "Set a count on a barter to add it here." appears.
The box at the top shows the totals.
- Cost to buy: The cost of buying the materials you are short at the lowest Auction House price. If some materials have no known price, "+○ unpriced" is added.
- With crafting: Shown when some of the materials you are short are better to make yourself. It is the cost when you make those materials and buy the rest.
- To ○○: The time to reach the destination Trading Post picked in Route.
- "○ / ○ materials ready": The number of kinds of needed materials that you are not short of.
- Prices are "Lowest KR auction prices".
The Goods ○ box below it shows the goods you added, by Trading Post.
- Each item of goods shows its image, name, grade, and count (×○). Goods from the starting Trading Post come first.
- Press the X button at the end of a row to remove that item of goods from the plan. Hover over it to see Remove.
- Press Clear to remove all goods you added. The message "Plan cleared." appears with an Undo button. Press it to go back to before clearing.
The box at the bottom shows the materials needed, one per row.
- Below each material name is Need ○. If you are short, Short ○ is also shown. If you have them all, Ready is shown.
- Enter the count you have in the Owned box.
- Press the check button next to it to fill the owned count up to the needed count. Hover over it to see I have enough.
- The ○ each price is shown on the right. If there is no price, one of No listings, Not on auction, or No price data is shown.
- For materials you are short, the cost of buying the shortage is shown below.
- Among the materials you are short, those that can be made show Craft ○ and a material tree button. Press the button to open the material tree window for that material.
Material tree window
Press a material tree button in the plan to open the "material tree (material name) (ID)" window.
- At the top are the material name and count, and the cost of buying what you are short. If there is nothing to buy, it shows Nothing to buy.
- Material Tree: Shows the materials needed to make it as a tree. Press an arrow to expand or collapse it.
- Spots where one of several materials can be used have "(or ○)" added.
- Materials that need to be made several times have "(○ crafts × ○)" added.
- Materials that can be made but are cheaper to buy have a shopping cart mark. Hover over it to see Buying is cheaper.
- Materials covered by what you own have a check mark.
- Raw Materials: Shows the materials to buy or gather. Enter the count you have in a box to recalculate right away. Each material shows Buy ○, Craft ○ or Ready, the price for one, and the cost to buy.
Route
- Pick the starting Trading Post with the button at the top. Before you pick one, it shows Barter Trading Post. After you pick one, it shows "From ○○".
- At running speed is written on the right.
- Below that are the destination Trading Posts and the time it takes ("○m ○s"). At first, the fastest one is picked. Click another one to pick that route.
- If there are no routes from the starting Trading Post, "No routes from this post." appears.
- The collapsed section below the list shows the name of the current mount. When buffs are on, a "×○" multiplier is also added. Click it to expand it.
- Commerce Mount: Choose a mount.
- Buffs: Choose the buffs to turn on. A single buff is shown as a checkbox, and a buff where you choose one of several is shown as a selection box. Choose None in a selection box to turn it off.
- At the bottom, the chosen route is shown on a map for each area. The path is drawn as a line on the map, along with the area names and the time spent in each area.
Cargo
- Choose a mount in the Commerce Mount box at the top. It changes together with the mount in Route.
- Below that, the mount's "Slots ○ · Weight ○" is shown. Base capacity is written on the right.
- The goods you added are shown in boxes by Trading Post. At the right of each box title is how many trips it takes to carry them ("○ trips").
- Each box shows, for each Trip ○, the "Slots ○/○ · Weight ○/○" used and the goods and counts carried.
- If some goods cannot be carried, "Some goods do not fit." appears.
Good to know
- The counts you entered, owned counts, and route settings are saved in this browser. They are saved separately for each region.
- The counts entered in the Owned boxes are shared with the Raw Materials boxes in the material tree window.