
Plan Your Homestead Layout
Plan your Homestead layout in a 3D view. Place, move, and rotate housing items while checking the cells used, Homestead EXP, and items needed.
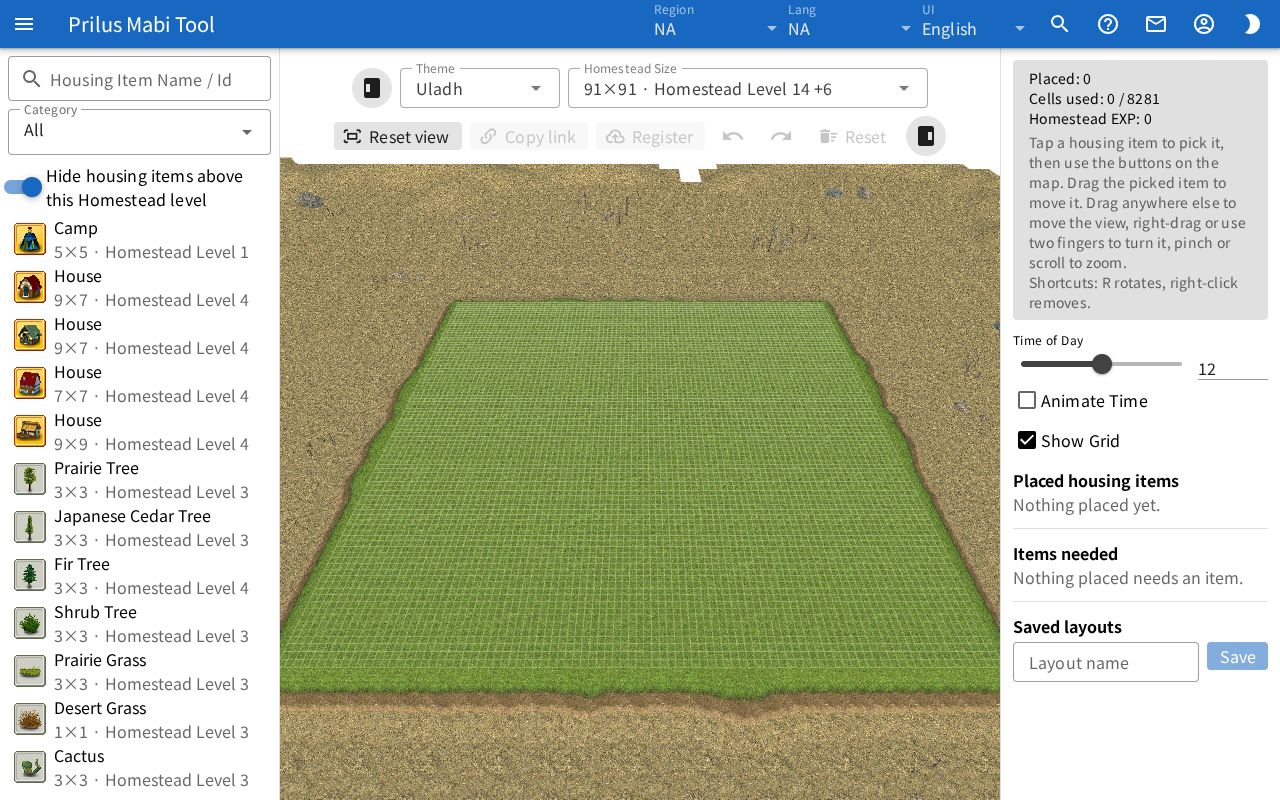
Screen layout
- Left: The housing item list. At the top are the search box, Category, and the Hide housing items above this Homestead level switch.
- Center: The 3D view of the Homestead. A toolbar floats at the top.
- Right panel: The placement summary, time of day, Placed housing items, Items needed, and Saved layouts, in that order.
- On a narrow screen, the 3D view is at the top, followed by the housing item list and the right panel.
Basic use
- Choose a Theme and Homestead Size in the toolbar.
- Click the housing item to place in the housing item list on the left.
- The housing item is placed in the empty spot closest to the center of the 3D view.
- Drag the placed housing item to the spot you want.
- Rotate the housing item with the Rotate button at the bottom of the view.
- Check the cells used, Homestead EXP, and items needed in the right panel.
Your layout is saved in this browser automatically. The next time you open the page, your last layout is shown as it was.
Toolbar
It is at the top of the 3D view. From the left, it has the following buttons.
- Leftmost button (Show or hide the housing item list): Collapses or expands the housing item list on the left.
- Theme: Choose the Homestead theme. If the new theme has the same size as before, it changes to that size. If not, it changes to the smallest size.
- Homestead Size: Shows the number of cells along with the Homestead level.
- Reset view: Returns the view so the whole Homestead is shown.
- Copy link: Copies a link that opens the current layout. See Sharing by link below.
- Register: Registers the current layout under a name. See Register Homestead below.
- Reset: Removes all placed housing items.
- Rightmost button (Show or hide the side panel): Collapses or expands the right panel.
Copy link, Register, and Reset can be pressed only when at least one housing item is placed. Whether the list and panel are collapsed is remembered in this browser. On a very narrow screen, the toolbar buttons show only icons without text.
Changing Theme or Homestead Size keeps the placed housing items. Only the ones that cannot be placed on the new Homestead are removed, and the notice "Removed ○ item(s) that do not fit this Homestead." appears.
Housing item list
- Each housing item shows its image, name, the cells it takes up (width×depth), and its Homestead level.
- Housing Item Name / Id: Search by name or ID.
- Category: Choose All or a category such as Building, Workshop, or Field.
- Hide housing items above this Homestead level: On at first. While on, housing items above the Homestead level of the Homestead size you picked are not shown in the list.
- Housing items that cannot be used with the current theme are not shown in the list.
Click a housing item in the list to place it in the empty spot closest to the center of the 3D view, and it is selected right away. If it cannot be placed, the reason appears at the top of the view. For example: "No room left for ○○.", "You cannot place more of this one.", or "Too many items placed."
Using the 3D view
Selecting housing items
- Click a housing item to select it. A selected housing item gets a yellow outline.
- When selected, the housing item's image and name and the Rotate and Delete buttons appear at the bottom of the view. On a very narrow screen, the name is left out.
- Press × or click empty ground to deselect it.
Moving and rotating
- Drag a selected housing item to move it. While dragging, the spot where it will go is shown with a green outline. Spots where it cannot go are shown with a red outline.
- If you let go on a spot where it cannot go, the housing item returns to where it was, and a reason such as "Something is already there." or "That spot is outside the Homestead." appears at the top of the view.
- Press Rotate to turn it 90 degrees at a time. If the rotated shape does not fit its spot, "It does not fit when rotated. Move it first." appears.
Changing the view
- Drag anywhere other than the selected housing item to move the view.
- Drag with the right mouse button to rotate the view. Scroll the wheel to zoom in or out.
- On a touch screen, drag with one finger to move the view. Drag with two fingers to rotate the view, and spread or pinch two fingers to zoom in or out.
Shortcuts
On a wide screen, the right panel shows the notice "Shortcuts: R rotates, right-click removes."
- R key: Rotates the selected housing item. If nothing is selected, it rotates the housing item under the mouse. It does not work while typing in a search box.
- Right-click: Clicking in place without dragging removes that housing item.
Removing and undoing
- Remove a single housing item with Delete at the bottom of the view, a right-click, or the trash button in the Placed housing items list.
- When you remove one, the message "Removed ○○." appears at the top of the view with an Undo button. Press it to bring the removed housing item back. If its spot is blocked, it is placed in the closest empty spot.
- Press Reset in the toolbar to open the "Remove all ○ placed item(s)?" confirmation window. Confirm to remove them all. You can bring them back with Undo in the message.
- The message disappears on its own after a moment. Once it disappears, you cannot undo.
Right panel
Placement summary
- Placed: The number of housing items placed.
- Cells used: The number of cells used and the total cells of the Homestead.
- Homestead EXP: The sum of the Homestead EXP of the placed housing items.
- Below that is a guide to using the 3D view.
Time of day and grid
- Time of Day: Change the time of day from 0 to 24 with the slider. You can also enter a number in the box on the right. The sky and light change to match that time.
- Animate Time: When on, time passes on its own.
- Show Grid: Shows or hides the cell lines on the ground. On at first.
Placed housing items
- Each placed housing item shows its name, position, and the cells it takes up. The position is a coordinate with the center of the Homestead as (0, 0).
- Click a row to select that housing item and move the view toward it.
- Press the trash button to remove that housing item.
Items needed
Shows the items and counts needed for the placed housing items. If no items are needed, "Nothing placed needs an item." appears.
Saving and loading layouts
Use Saved layouts at the bottom of the right panel. Layouts are saved in this browser.
- Enter a name in Layout name and press Save. If you leave the name empty, a name such as "Layout 1" is given.
- Names are saved up to 30 characters. If the name already exists, the "Overwrite ○ with the current layout?" confirmation window opens. Confirm to overwrite it.
- You can keep up to 12 saved layouts. When there are 12, "You can keep up to 12 layouts. Delete one first." appears and the layout is not saved.
- Click a name in the list to load that layout. Press the trash button to open the "Delete ○?" confirmation window. Confirm to delete it.
- If you were editing a layout before opening a layout by link, that layout stays at the top of the list as Layout before opening a link. Click it to load it, and delete it with the trash button.
- Saved layouts are kept separately for each region.
- If saving fails, "Could not save. Browser storage may be full." appears.
Sharing by link
- Press Copy link in the toolbar to copy a link that opens the current layout, and "Link copied." appears.
- If the browser blocks copying, a window with the link appears. Copy it from there yourself.
- Open a link you received to show that layout. If the link cannot be read, "Could not read that layout." appears.
- If you open a link while editing a layout, the message "Opened the linked layout." appears with an Undo button. Press it to go back to the layout you were editing. That layout also stays in the Saved layouts list as Layout before opening a link.
Register Homestead
Press Register in the toolbar to open a window. Register the current layout under a name. Anyone can look it up by name in Homestead Lookup.
You need to sign in.
- Sign in with a sign-in button in the window (for example, Sign in with Microsoft). Once signed in, "Signed in as ○○" and Sign out appear.
- Enter a Name.
- Press Register. When you register, a link that opens that Homestead is also copied.
- If you enter a name you have already registered, the button changes to Overwrite. Press it to open the "Overwrite ○○ with this layout?" confirmation window.
- You cannot use a name someone else has already registered.
- You can register up to 20 Homesteads.
- If a name does not follow the rules, the reason appears below the input box. For example, a name cannot start with a number. Numbers can only be used at the end of a name. English letters cannot be mixed with other characters.
Under My Homesteads, your registered Homesteads are listed with their region and updated time. While loading, a progress bar is shown. If you have not registered any, "No homesteads yet." appears.
- Click a row to open that Homestead in Homestead Lookup.
- Press the link button (Copy link) to copy a link that opens that Homestead.
- Press the save button (Overwrite) to overwrite that Homestead with the current layout. To overwrite a Homestead registered in another region, switch to that region first.
- Press the trash button to open a confirmation window. Confirm to delete the registered Homestead.
Good to know
- In regions with no Homestead data, "No Homestead data for this region." appears instead of the 3D view.
- If a housing item model fails to load, "Could not load the model for ○○. It still takes up space but is not shown." appears.